
And summer past without much posting from me. So unlike me! Summer can be the most fun to blog about and yet I had a new perspective this year… the perspective of someone who HAS TO get her blood pressure in check so I let a lot of things just slide. Hopefully I will have time to post some warm fuzzy summer memory posts on here in the near future.
All posts in Foodie Like Me
Dirt, Seeds, Hoping For Growth

All one really needs is some tilled dirt. Today I found three relativity small patches in the yard that I could tame into a garden. Grass and weeds had to be dug out and I gave the soil a turn with a garden claw. All very rewarding work in spite of my complaining back.
Rewards

Everyone likes to be rewarded. My youngest and I found these delicate desserts after a morning of much running around. They appeared to be the perfect reward for the two of us, after all we had both been on our best behaviour this grocery day.
‘Chili Needs Cheese’ and ‘Corner Store Movies’

Did you know you can still rent movies at the corner store? Well we can! Good thing too, with no cable and all the channels digital (thus inaccessible for us) the big movie store names disappearing faster then I would have said “When did that happen?”, we are pretty limited at our house.
Winter Thumbs Up

A cold has kept me stuck at home for almost two weeks, voiceless for the last week, and while colds are one of my least favorite things about winters set in, there are many other things worthy of a double thumbs up. Thumbs up is my youngest child’s favorite way to express pure pleasure in the littlest of things. I have collected my current top five winter wonderfuls, in no particular order, to share.
A Week Of Mornings

If you like table top books I highly recommend ‘A Year of Mornings’. Inspired by this photography book’s subject and approach, AND to celebrate not being sick every morning any more, I collected a week of morning pictures for this post
French Jam and Iced Tea
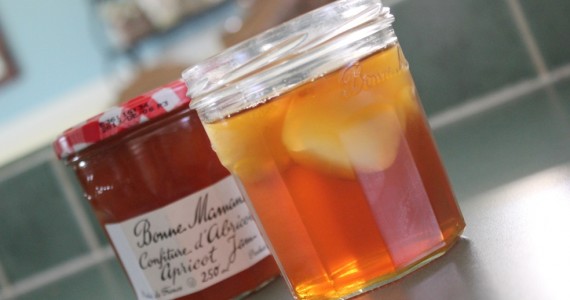
Call it thrifty or good recycling, I like the sound of ‘clever domesticity’! A little inexpensive solution for at home is always a treasure of a find when it is a pretty solution as well!
My Guac! (Recipe Request)
I’m going to share a recipe that has become a family tradition in our house. It is a long time party favorite, and has changed many a persons opinion on avocados. Time to share it. Sorry that I couldn’t remember where I found it, so you will have to try my altered version.
LIGHT Guacamole
(Yields 2 Cups)
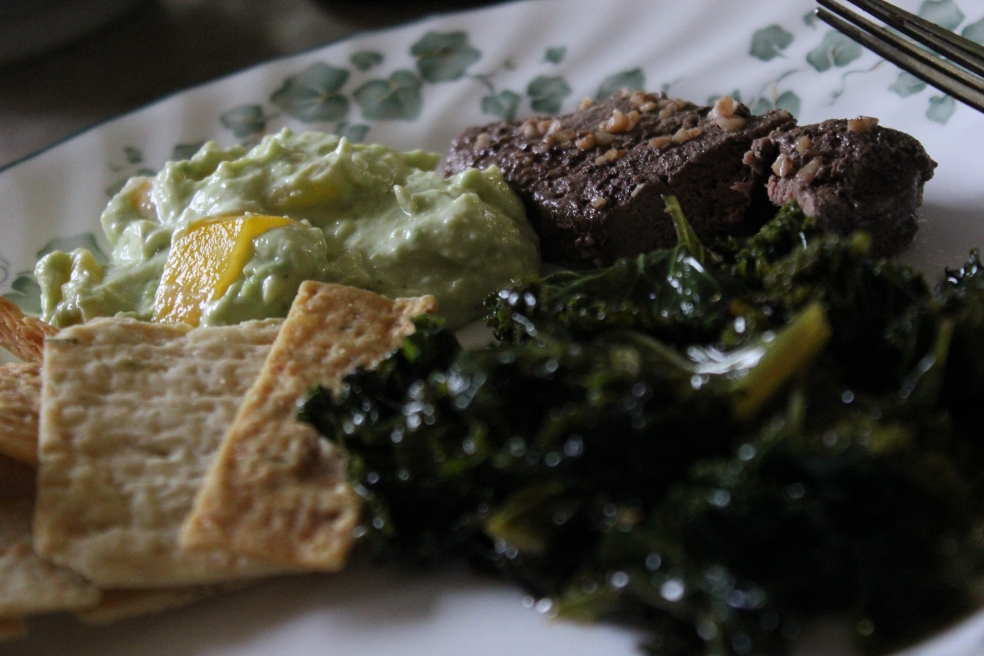 |
| (The Guac is on the left, with yellow peppers.) |
1 cup cottage cheese
1 Tbsp sweet onion (or 1 1/2 tsps onion flakes)
1-3 garlic cloves minced (add as many as you think you can handle)
1 tsp salt (add more to taste)
pinch cayenne pepper
3 tsps lemon or lime juice
1-2 avocados (your choice based on how light you want it)
1 sweet bell pepper chopped
- Chop fine the sweet onion, mince the garlic and peel and chunk the ripe avocado(s).
- Process all ingredients but the bell pepper, till smooth. I like to leave some of the avocados chunky but it is your preference again.
- Chop the pepper (red is nicest) and place about a third of it in the bottom of a bowl.
- Add half the guacamole on top of the peppers.
- Scatter more peppers and then add the last of the dip.
- Sprinkle the last of the peppers on top.
- Cover with plastic wrap and be sure the plastic is touching the entire surface of the dip (or it will brown).
- Refrigerate for about 2 hours for best taste. Use up with in 24 hours.
- Serve with Taco style chips or veggies.
TTFN
No Cocoa? No Worries!

Started melting butter for my mom’s brownie recipe when I realised I had some brownie making issues. First off, her recipe called for walnuts and as these where for school, no nuts allowed. Grabbed a bag of shredded coconut to replace the nuts, save. Second, I realised I had NO COCOA! Grabbed the chocolate chips and melted a bunch into the butter, till it was nice and dark, and SAVE again. They where absolutely lovely brownies!
Of course my tweaking didn’t stop there… replaced the sugar with coconut sugar (because it has a profoundly lower glycemic effect) and then added some high fiber grains for good measure, this didn’t result in heavy brownies. Finally I had no time to ice the brownies (making this quick recipe late at night) so the chips came in handy again, being thrown on top before baking made a nice replacement for icing.
I really enjoy my mothers original recipe. It was the first baking I made as a girl. Hopefully next time I go to make it I will have the proper ingredients on hand… that being said, these coconut brownies where very enjoyable in their own right and will for sure be faithful school lunch baking.
Chocolate Coconut Brownies
1/2 cup melted butter
3/4 cup chocolate chips (or more for darker brownies)
1/2 cup coconut sugar (also called organic palm sugar)
1/4 cup spelt bran
1/4 cup toasted wheat germ
1 egg
1/2 cup unbleached flour (and a little bit more for good measure, like 2 tablespoons)
1/2 tsp baking powder
1/2 cup unsweetened coconut shavings
1 tsp vanilla
- Melt the butter and throw the chocolate chips in while warm, stirring till melted.
- Add melted mix to the coconut sugar.
- Add each item after that, mixing well.
- Scrape into 8×8 greased pan.
- Top with chocolate chips before baking.
- Bake at 350 degrees for EXACTLY 20 minutes.
Do you have a favorite baking substitute that wowed you, or just plain saved the day? Please share in the comment section!
Happy adventures in baking everyone, and remember to learn substitute options, they will save your baking sanity for sure!
TTFN
H’orderves on the Menu

Since Garnet was diagnosed with hypoglycemia the traditional meat and potato meals have been out the window in our house. While it was a struggle to learn to cook with NO SUGAR and LOW STARCH I am finding a groove. Add to this dietary restriction four kids to cater to….
To be honest, this Mama isn’t the catering type. If I serve them something they don’t like (after having tried it) I will reintroduce it over and over till they DO like it. This is how I won on the avocado front!
All that good parenting advice aside, I like to treat them now and again. That means asking what they would like for supper or making something I know they will love. On the weekend I surprised them with pancakes and strawberries for lunch (high protein and fiber, sugar free but they didn’t no that). The other night I needed a meal in a hurry and dared to ask for their hearts desires. They all agreed on ‘salmon h’orderves’. I started making them cracker topped snacks years ago and to them it is the fanciest of my meals.
Salmon h’orderves is what they call the meal in the photograph at the top of the post. Salmon salad atop some greens on a cracker and then topped with cheese, in this meals case we had havarti. I boiled a few eggs, steamed some broccoli and made an avocado salad for good measure… done in little time. One of my oldest kids found the home made apple cinnamon sauce in the fridge and requested it as ‘a side’… since it too is sugar free I agreed with little pressure.
The kids had seconds and thirds and…I told them I was done making h’orderves when they pleaded for fourths. A speedy, healthy meal all around and all the better because my crew thought it was grand!
Do you make your kids h’orderves’? If so what are yours like? Fancy actual h’orderves or ‘kid style’ ones?
Bless you and your meal making efforts!
TTFN